

Happy New Year!
Ringing in the New Year with ski slopes, snowy vistas, and the scrumptious viral Dubai Chocolate.

Happy New Year! I hope you all had a wonderful holiday and a joyful time ringing in the New Year. The end of the year can be full of stressors, from the parties to gifts to travel. My husband, son, and I were able to escape the end of year chaos by bundling away to a ski retreat for a short trip to recharge.
I grew up in a snowy city in eastern Türkiye known for its skiing, so the winter has a special place in my heart. However, it wasn’t until marrying my husband and moving to the U.S. that I became an avid skier. I love everything about it—the views, the outfits, the exercise. This made it especially hard when I had a ski accident last year that landed me in months of physical therapy. Approaching the slopes this year was certainly intimidating, but thankfully I was still able to reintroduce myself to the sport and enjoy my time.
The first week of our trip was full of rain rather than snow, but by the end our prayers were answered and we had the most spectacular snowy vistas!

In classic New Year’s Resolution fashion, after a December inundated with desserts, our family is dramatically cutting back on sweets. But this doesn’t mean they need to disappear entirely! Small bites of luscious treats can bring immense satisfaction and are the perfect way to the end day with our nightly tea routine.
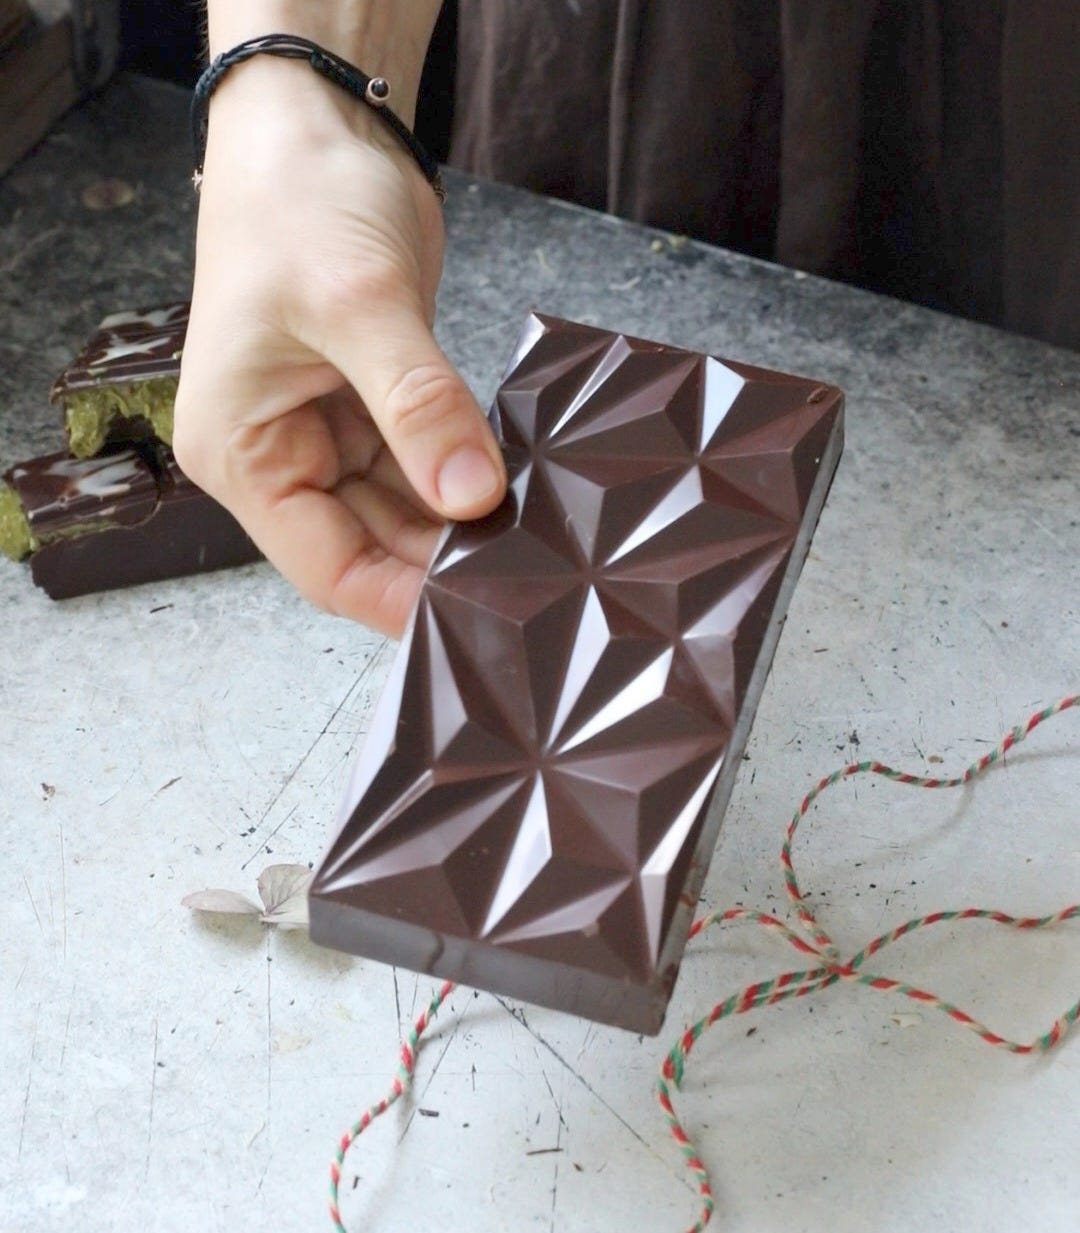
Enter: Dubai Chocolate. This viral chocolate bar is so popular for a reason! For months, many of my followers have mentioned it to me and I’m finally here with all of my tips and tricks for making it at home. With rich chocolate and a sweet, creamy, crunchy pistachio cream and kataifi filling, this is a treat you will want to savor for every bite.
Because this dessert has so few ingredients, it is very important that you get each of them right. It is a bit of an investment and many of the ingredients can’t be purchased in stores, so I’ve included my brand recommendations and each little step of the process so you won’t have any wasted time or money with an absolutely delicious result. I’ve included the full recipe at the bottom of the page, but I highly recommend going through the tips below for best results.
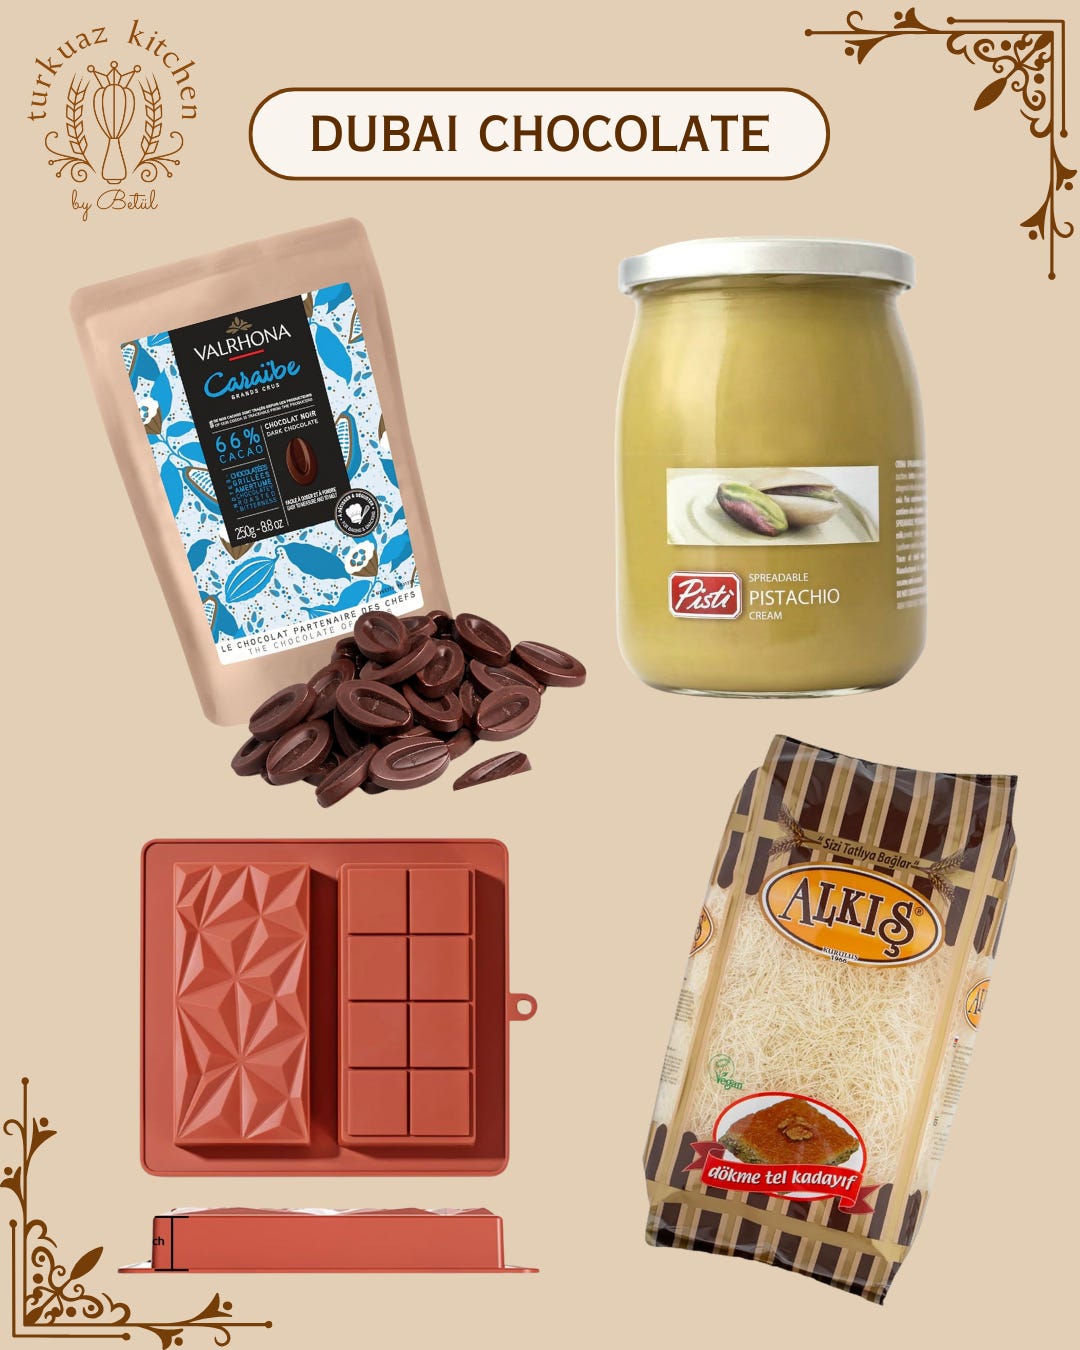
Here are links for each of the products included above. Keep scrolling for a step by step process, as well as my reasoning for each product!
Valrhona Chocolate - 66% Cacao
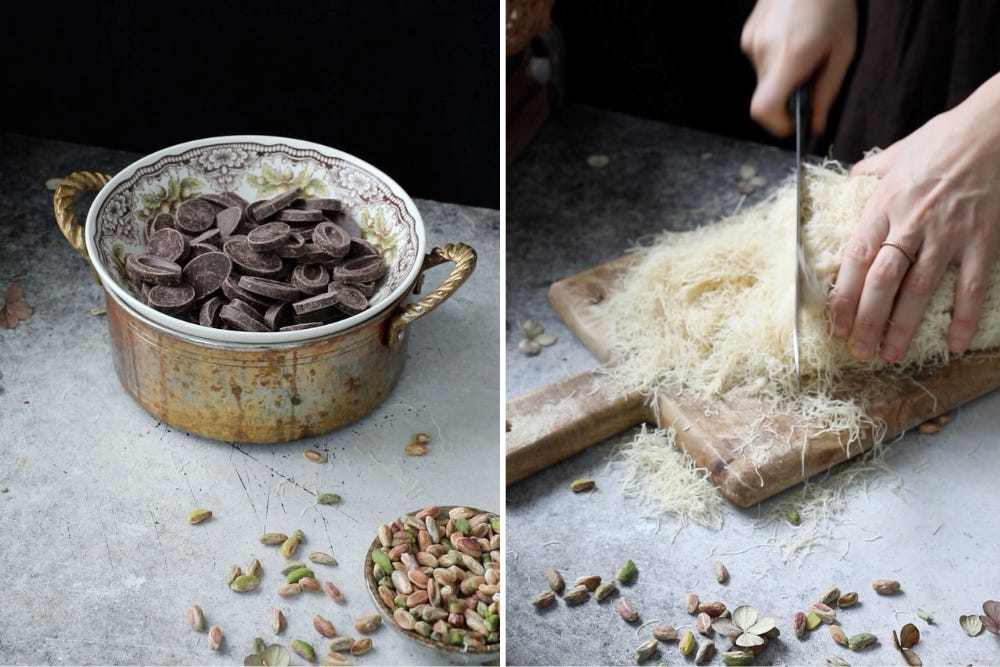
Starting with the chocolate, Valrhona Chocolate - 66% Cacao . Using high quality chocolate cannot be over emphasized in any dessert, but in this one it is especially important. I wanted a dark chocolate to balance the sweetness of the filling, so this 66% cacao option was ideal—not too dark, but definitely with that robust chocolate flavor. Valrhona is one of my go-to brands for chocolate, I highly recommend their products even if you’re looking for a different cacao percentage. I tried this recipe with a homemade chocolate option and with storebought chocolate chips, and neither compared to these Valrhona baking discs.
Next, kataifi. There are a few different types of this product, so it’s important to get one that is very thin to have the correct texture in the bar. You want an untoasted version so you can complete that step yourself for a fresher taste. When chopping, make sure you slice it so you have thin bits that can be easily incorporated into the pistachio cream.
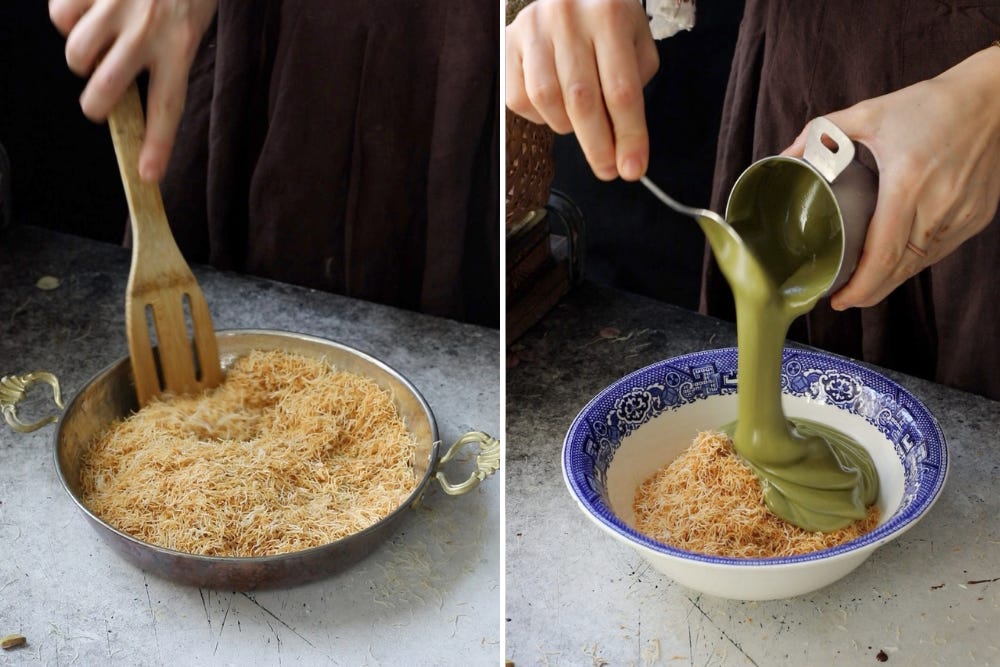
For the toasting process, adding peanut oil is optional but I recommend it to get a more even color.
Not all pistachio creams are created equal! You want a silky texture and rich nutty flavor, with a balanced sweetness. I found my perfect pistachio cream in this Pisti Pistachio Cream! It is pricy but I promise it’s worth it, especially compared to so many inferior products out there.

In the original dubai chocolate bar, there is a swirl of color on top. I tried this both with plain melted white chocolate and a food-colored white chocolate and found it difficult to achieve and unnecessary for flavor, so my favorite option was to leave it out entirely.
When filling the mold, be sure to coat the edges and reach every corner. Then, flip to drip the excess and store in the freezer for 10 minutes or so. I repeated this process one more time to get the chocolate thickness I was looking for. You want a chocolate layer sturdy enough to fully contain the filling, but not overpower the pistachio flavor.
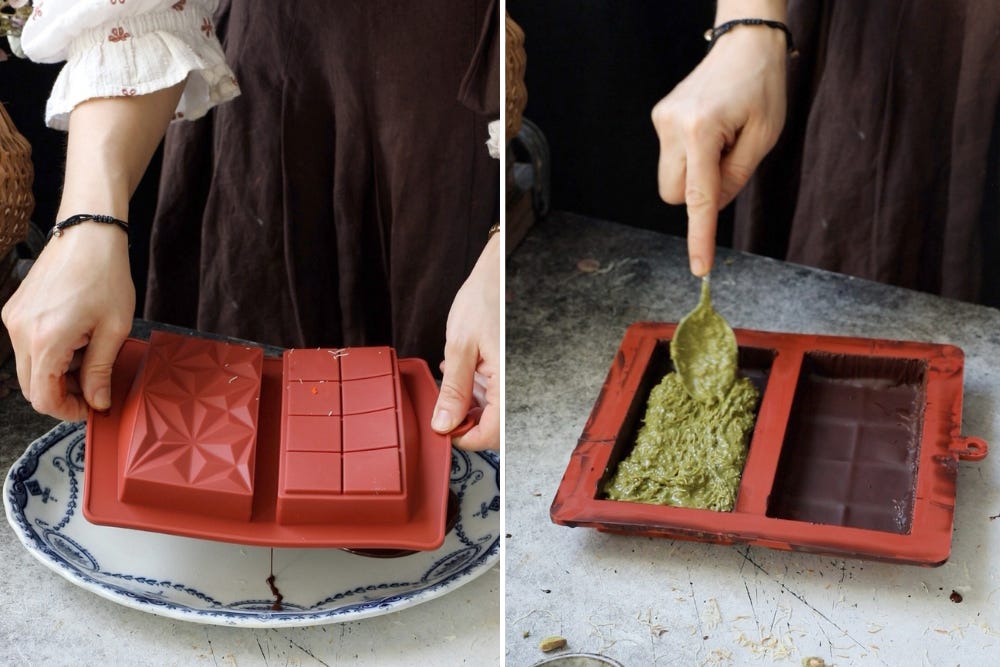
The type of chocolate mold you use will also make a big difference to your process. You want a thick, sturdy silicone that is bendable but won’t break or get misshapen. I found the most success in this 1 Inch Chocolate Mold from Amazon. They have different thicknesses available, but I found the 1 inch to be allow the perfect ratio of chocolate to filling.
When using a good chocolate, you shouldn’t have issues with the remaining melted chocolate setting on the counter before adding the final layer. Be sure to use a flat edge to scrape the top and edges of the chocolate so it sits evenly.
And you’re done! At this point, you can enjoy your delicious chocolate bar with tea or coffee on the side. Wrap the remaining chocolate in parchment paper and store in the fridge.

Here is the full recipe for your use. Enjoy, and let me know how it goes!
Ingredients:
1 1/2 cups kataifi
1 tbsp peanut oil (optional)
1 heaping cup (320g) pistachio cream
1/4 cup crushed pistachios (optional)
250g high quality chocolate (66% cocoa or to your preference)
Instructions:
Using a sharp knife, cut the kataifi into small pieces as in the IG reel. Add into a medium pan over low heat, toast the kataifi slowly, stirring occasionally. When the color becomes a light golden, add peanut oil (optional) and continue to toast until crisp and golden brown. Set aside.
Melt the chocolate over a bain marie. Remove from the heat and let sit while mixing the kataifi mixture.
Once the kataifi is room temp, add into a medium bowl with the pistachio cream and crushed pistachios. Mix together until fully combined.
Pour the melted chocolate into the mold, tilt to coat the bottom and sides, and then flip over to allow the excess to drip out. Immediately place into the freezer for around 10 minutes just until set. If the chocolate looks too thin, repeat this process one more time on top of the first layer of chocolate.
Divide the kataifi mixture in two and spread evenly over both sides of the chocolate bar. Pour the remaining chocolate over the top and use a straightedge to smooth the surface. Return to the freezer for 10 to 15 minutes until set.
Carefully remove from the mold and wrap with parchment paper. Serve immediately or store in the fridge. Let sit at room temp for a few minutes before serving.
Bon appetit!
Your Dubai Chocolate bars are perfect! I was waiting for you to post this newsletter with all the brands used to make it since your Instagram video was fantastic! Thank you so much for sharing, Betul!
That looks so incredibly yummy. I had Dubai chocolate with pistachio cream and sesame recently for the first time and it was so good. Can only imagine how amazing this might taste.